
Home » How to Block Countries from Your WordPress Website | wordpress
How to Block Countries from Your WordPress Website | wordpress

There are a number of reasons you might want to block traffic from certain countries from accessing your WordPress website. Maybe you’re only targeting customers in a specific country or region, or maybe you’ve been the victim of cyberattacks originating from a particular country. Whatever the reason, there’s an easy way to block traffic from specific countries using a WordPress plugin.
Table of Contents
To get started, you’ll need to install and activate the GeoBlocker plugin. Once the plugin is activated, click on Settings and then click on the tab labeled “Geo-blocking.” From here, you can select which countries you want to block from accessing your site. You can also choose to block traffic from entire continents if you wish. The plugin will then automatically redirect any traffic originating from the blocked countries to a “404 not found” page.
Of course, blocking traffic from certain countries can have some negative consequences. For example, if you accidentally block traffic from a country that you actually want to target, you’ll lose out on potential customers or subscribers. Furthermore, blocking traffic from certain countries could also hurt your search engine rankings since Google and other search engines use a user’s location to deliver results. So, use this feature sparingly and only when absolutely necessary.
How to block unwanted countries from accessing your website?
Whether you’re running a small business website or a large e-commerce store, there’s always the risk that someone from an unwelcome country will try to access your site. This can lead to a number of problems, including decreased website performance, security vulnerabilities, and even legal issues. Thankfully, there are a few easy ways to block unwanted countries from accessing your website. In this post, we’ll show you how to do just that.
Why You Might Need to Block Countries?
There are a number of reasons why you might need to block certain countries from accessing your website. For example, maybe you’re only selling products to customers in the United States and Canada, so you don’t want anyone outside of those two countries trying to access your site. Or, maybe you’re concerned about hackers from a particular country targeting your website. In either case, blocking access to your site from specific countries can help reduce the risk of malicious activity and improve your website’s overall security.
How to Block Countries in WordPress?
There are a few different ways that you can block countries in WordPress. One popular method is to use a WordPress plugin like Jetpack Security or Wordfence Security. These plugins both offer country blocking features that are easy to set up and manage. Another option is to edit your site’s .htaccess file directly. This approach is slightly more technical, but it can be just as effective as using a plugin.
Write the article about What does Geo-blocking in WordPress mean?
Geo-blocking is the process of restricting access to online content based on a user’s geographical location. This means that if you try to access a website or piece of online content from a country that is not allowed, you will be blocked from doing so. There are a number of reasons why someone might want to geo-block their content, including preventing cyberattacks, reducing website traffic from unwanted countries, and complying with government regulations.
Geo-blocking can be implemented in a number of ways, but the most common method is to use a WordPress plugin. There are a number of plugins available that offer geo-blocking features, so you can easily find one that meets your needs. Once you’ve installed and activated the plugin, you can then specify which countries you want to block from accessing your site. The plugin will then handle the rest, redirecting any traffic from the blocked countries to a “404 not found” page.
It’s important to note that blocking traffic from certain countries can have some negative consequences. For example, if you accidentally block traffic from a country that you actually want to target, you’ll lose out on potential customers or subscribers. Furthermore, blocking traffic from certain countries could also hurt your search engine rankings since Google and other search engines use a user’s location to deliver results. So, use this feature sparingly and only when absolutely necessary.
Write the article about How to identify which country IP address to block in WordPress?
There are a few different ways that you can identify which country IP address to block in WordPress. One popular method is to use a WordPress plugin like Jetpack Security or Wordfence Security. These plugins both offer country blocking features that make it easy to identify and block unwanted traffic from specific countries. Another option is to edit your site’s .htaccess file directly. This approach is slightly more technical, but it can be just as effective as using a plugin.
Once you’ve identified the country IP address that you want to block, there are a few different ways that you can go about doing so. One option is to use a WordPress plugin like Jetpack Security or Wordfence Security. These plugins both offer country blocking features that make it easy to block unwanted traffic from specific countries. Another option is to edit your site’s .htaccess file directly. This approach is slightly more technical, but it can be just as effective as using a plugin.
If you decide to edit your .htaccess file directly, the first thing you’ll need to do is add the following code:
Order Allow,Deny
Deny from Country_Code
Replace “Country_Code” with the actual country code that you want to block. For example, if you want to block traffic from the United States, you would use “US” as the country code. Once you’ve added the code to your .htaccess file, save your changes and upload the file to your server.
Keep in mind that blocking traffic from certain countries can have some negative consequences. For example, if you accidentally block traffic from a country that you actually want to target, you’ll lose out on potential customers or subscribers. Furthermore, blocking traffic from certain countries could also hurt your search engine rankings since Google and other search engines use a user’s location to deliver results. So, use this feature sparingly and only when absolutely necessary.
Use a security plugin with a firewall:
If you want to block traffic from a specific country, one of the easiest ways to do so is to use a security plugin that has a firewall feature. Jetpack Security and Wordfence Security are two popular plugins that offer this functionality. Once you’ve installed and activated either of these plugins, you can then go to the “Country blocking” section and add the countries that you want to block. The plugin will then handle the rest, redirecting any traffic from the blocked countries to a “404 not found” page.
It’s important to note that blocking traffic from certain countries can have some negative consequences. For example, if you accidentally block traffic from a country that you actually want to target, you’ll lose out on potential customers or subscribers. Furthermore, blocking traffic from certain countries could also hurt your search engine rankings since Google and other search engines use a user’s location to deliver results. So, use this feature sparingly and only when absolutely necessary.
Use a CDN:
If you’re looking for a more comprehensive solution, you may want to consider using a content delivery network (CDN). A CDN is a network of servers that deliver content to users based on their geographic location. Most CDNs have the ability to block traffic from specific countries, which can be helpful if you’re trying to prevent unwanted traffic from reaching your website. Some popular CDNs include Cloudflare and Incapsula.

Keep in mind that using a CDN is a more advanced solution and may not be necessary for all websites. If you’re not comfortable using a CDN, or if you don’t think it’s worth the cost, you can stick with one of the other methods described in this article.
Using Google Analytics:
If you’re using Google Analytics, you can also use it to block traffic from specific countries. To do this, go to your Google Analytics account and click on the “Admin” tab. In the “View” column, select the view that you want to edit. Then, in the “Country” section, click on the “Add Filter” button.
In the “Filter Name” field, enter a name for your filter. Then, in the “Filter Pattern” field, enter the country code that you want to block. For example, if you want to block traffic from the United States, you would enter “US”. Once you’ve done that, click on the “Save” button to save your changes.
Write the detail article about Using WordPress plugin to block country [RECOMMENDED]:
If you want to block traffic from a specific country, one of the easiest ways to do so is to use a security plugin that has a firewall feature. Jetpack Security and Wordfence Security are two popular plugins that offer this functionality. Once you’ve installed and activated either of these plugins, you can then go to the “Country blocking” section and add the countries that you want to block. The plugin will then handle the rest, redirecting any traffic from the blocked countries to a “404 not found” page.
It’s important to note that blocking traffic from certain countries can have some negative consequences. For example, if you accidentally block traffic from a country that you actually want to target, you’ll lose out on potent
1- Block country by MalCare:
First thing you need to do is install and activate the MalCare Security plugin. For more details, see our step by step guide on how to install a WordPress plugin.

Upon activation, you need to visit Security » Firewall page to configure plugin settings.
MalCare comes with a powerful firewall that not only blocks malicious requests but also helps you identify and blacklist suspicious IP addresses.
To get started, click on the ‘Enable Firewall Protection’ button. This will turn on the firewall and enable features like Country Blocking, IP blocking, and blacklist monitoring.
On the next page, you need to select the countries that you want to block from accessing your WordPress site.
You can either select countries from the list or search for a specific country by name. Once you have selected the countries, click on the Block button to save your changes.
MalCare will now block all traffic from the selected countries. If someone from a blocked country tries to access your WordPress site, they will see a message saying “This site can’t be reached.”
2- Block country by Wordfence Plugin:
First thing you need to do is install and activate the Wordfence Security plugin. For more details, see our step by step guide on how to install a WordPress plugin.
Upon activation, you need to visit Wordfence » Firewall page to configure plugin settings.
Wordfence comes with a powerful firewall that not only blocks malicious requests but also helps you identify and blacklist suspicious IP addresses.
To get started, click on the ‘Enable Firewall Protection’ button. This will turn on the firewall and enable features like Country Blocking, IP blocking, and blacklist monitoring.
On the next page, you need to select the countries that you want to block from accessing your WordPress site.
You can either select countries from the list or search for a specific country by name. Once you have selected the countries, click on the Block button to save your changes.
Wordfence will now block all traffic from the selected countries. If someone from a blocked country tries to access your WordPress site, they will see a message saying “This site can’t be reached.”
3- Block country by Sucuri Plugin:
First thing you need to do is install and activate the Sucuri Security plugin. For more details, see our step by step guide on how to install a WordPress plugin.
Upon activation, you need to visit Sucuri Security » Firewall page to configure plugin settings.
Sucuri comes with a powerful firewall that not only blocks malicious requests but also helps you identify and blacklist suspicious IP addresses.
To get started, click on the ‘Enable Firewall Protection’ button. This will turn on the firewall and enable features like Country Blocking, IP blocking, and blacklist monitoring.
On the next page, you need to select the countries that you want to block from accessing your WordPress site.

You can either select countries from the list or search for a specific country by name. Once you have selected the countries, click on the Block button to save your changes.
Sucuri will now block all traffic from the selected countries. If someone from a blocked country tries to access your WordPress site, they will see a message saying “This site can’t be reached.”
4- Block country by Cloudflare Plugin:
First thing you need to do is install and activate the Cloudflare plugin. For more details, see our step by step guide on how to install a WordPress plugin.
Upon activation, you need to visit Cloudflare » Firewall page to configure plugin settings.
Cloudflare comes with a powerful firewall that not only blocks malicious requests but also helps you identify and blacklist suspicious IP addresses.
To get started, click on the ‘Enable Firewall Protection’ button. This will turn on the firewall and enable features like Country Blocking, IP blocking, and blacklist monitoring.
On the next page, you need to select the countries that you want to block from accessing your WordPress site.
You can either select countries from the list or search for a specific country by name. Once you have selected the countries, click on the Block button to save your changes.
Cloudflare will now block all traffic from the selected countries. If someone from a blocked country tries to access your WordPress site, they will see a message saying “This site can’t be reached.”

5- Block country by htaccess:
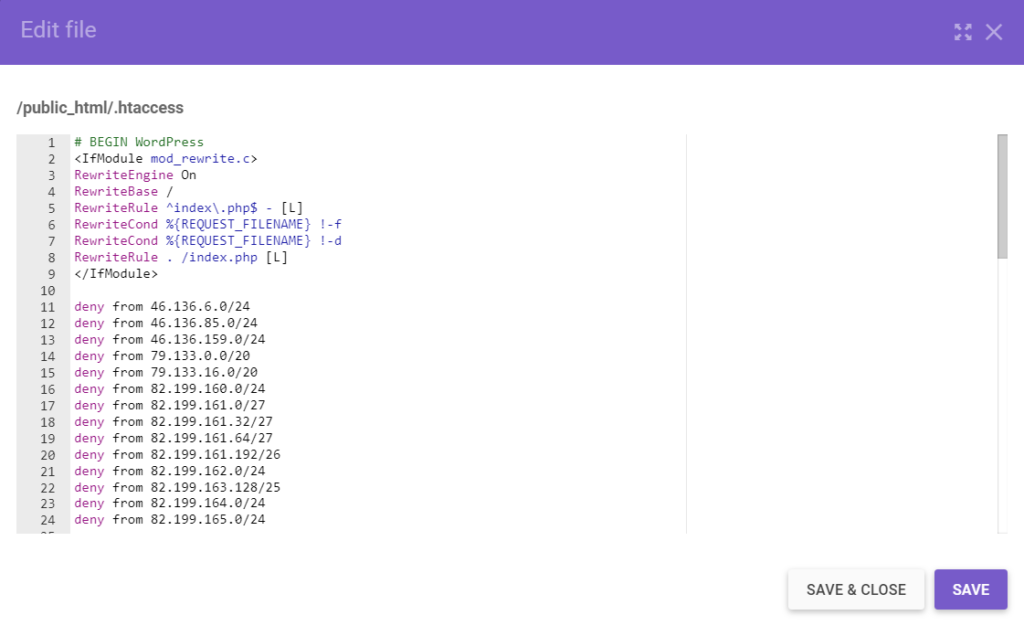
If you don’t want to use a WordPress plugin, then you can also block countries by adding code to your .htaccess file.
First, you need to connect to your website using an FTP client or File Manager in cPanel. Once connected, you need to edit the .htaccess file present in your website’s root directory.
You can either edit the file directly on your server or download it to your computer and upload it back after editing.
Once the file is open, you need to add the following code at the beginning of the file and save changes.
Replace XX with the two-letter country code that you want to block. For example, if you want to block traffic from United States, then you need to use US instead of XX.
You can find a complete list of country codes here. You can also block multiple countries by adding them on separate lines like this:
RewriteCond %{REMOTE_ADDR} ^12\.34\.56\.78$ RewriteRule .* –
Make sure that you replace 12.34.56.78 with the actual IP address that you want to block. If you want to block an entire range of IP addresses, then you can use CIDR notation (e.g., 192.168.1.0/24). You can find more information about CIDR notation in this article on Wikipedia.
That’s it. You can now visit your WordPress site to see the changes. If you want to unblock a country or an IP address, then you need to remove the corresponding code from your .htaccess file.
6- Block Country by iQ Block Country Plugin:
IQ Block Country is a WordPress plugin that lets you easily block visitors from specific countries. The plugin comes with an easy to use interface and offers features like country blocking, IP blocking, blacklist monitoring, two-factor authentication, etc.
To get started, you need to install and activate the IQ Block Country plugin. For more details, see our step by step guide on how to install a WordPress plugin.
Upon activation, you need to visit Settings » IQ Block Country page to configure plugin settings. On the blocked countries tab, you will find options to either select the countries that you want to block or enter IP addresses that you want to blacklist.
You can also allow access for logged-in users or whitelist specific countries. Once you are done, don’t forget to click on the Save Changes button to store your settings.
FAQ
Cloud flare comes with a powerful firewall that not only blocks malicious requests but also helps you identify and blacklist suspicious IP addresses. To get started, click on the ‘Enable Firewall Protection’ button. This will turn on the firewall and enable features like country blocking, IP blocking, and blacklist monitoring.
On the next page, you need to select the countries that you want to block from accessing your WordPress site. You can either select countries from the list or search for a specific country by name. Once you have selected the countries, click on the Block button to save your changes. Cloudflare will now block all traffic from the selected countries.
If you want to block a website on your phone, then you need to use a web browser that supports website blocking features. For example, Google Chrome comes with a built-in option to block websites. Here’s how you can use it to block a website on your phone:
First, you need to visit the website that you want to block in your Google Chrome browser. Once the website loads, tap on the three-dot menu icon located in the top right corner of your screen and select ‘Info’ from the drop-down menu.
On the next screen, scroll down to the ‘Site settings’ section and tap on the ‘Pop-ups and redirects’ option. This will open up a new pop-up window where you need to select the ‘Block (default)’ option in front of Pop-ups and redirects setting.
Google Chrome will now block all pop-ups and redirects from that website. You can also visit Settings » Advanced to find more options like site permissions, site data, etc.
If you are getting spam comments on your WordPress site, then we recommend that you use an anti-spam plugin like Akismet. Akismet is the most popular anti-spam plugin and it comes pre-installed with every WordPress site.
To get started, you need to visit Plugins » Add New page in your WordPress admin area and search for Akismet. Once you find it, click on the ‘Install Now’ button and then activate the plugin.
Upon activation, you need to visit Settings » Akismet page to get your Akismet API key. You can either sign up for a new Akismet account or use an existing WordPress.com account to get an API key.
Once you have your API key, simply copy and paste it in the required field on the Akismet settings page and click on the ‘Use this key’ button. Akismet will now start filtering all comments and mark them as spam if they look like spam.
If you want to block a website on your computer, then you need to use a web browser that supports website blocking features. For example, Google Chrome comes with a built-in option to block websites. Here’s how you can use it to block a website on your computer:
First, you need to visit the website that you want to block in your Google Chrome browser. Once the website loads, click on the three-dot menu icon located in the top right corner of your screen and select
‘Info’ from the drop-down menu.
On the next screen, scroll down to the ‘Site settings’ section and click on the ‘Pop-ups and redirects’ option. This will open up a new pop-up window where you need to select the ‘Block (default)’ option in front of Pop-ups and redirects setting.
Google Chrome will now block all pop-ups and redirects from that website. You can also visit Settings » Advanced to find more options like site permissions, site data, etc.
Conclusion:
In conclusion, the GeoBlocker plugin is a great tool for blocking traffic from specific countries on your WordPress website. However, it’s important to use this tool sparingly as it can have some negative consequences like hurting your search engine rankings.
Do you need any help regarding block countries or even any help let me know pleas?
If you’re having trouble accessing certain websites due to block countries, I can help you out. I have a service that will allow you to bypass these restrictions and access any site you want. Whether you’re trying to access government sites, social media, or just general information, I can help you get around the blocks. Let me know if you need any assistance – I’m always happy to help out. Thanks!